Showing posts with label cook books. Show all posts

Friday, November 9, 2012

Cupcake Project #40: White House Holiday Honey Cupcakes

Photo courtesy of Obama Foodorama
First, I have to congratulate President Barack Obama on his second term! Keeping up with the FLOTUS's initiative on healthier eating, the White House Executive Pastry Chef Bill Yosses created a healthier holiday honey cupcake to help satisfy the sweet-tooth(s) at the White House (although the POTUS has made it clear that he's a pie man himself with the exception of Sweet Mandy B's cupcakes in Chicago). This recipe reduces processed sugar and replaces it with honey from the White House's own beehive. Sweet!

White House Holiday Honey Cupcakes by Chef Bill Yosses
Photo courtesy of Obama Foodorama
Ingredients
1/4 cup softened butter

1/4 cup sugar

3/4 cup honey

2 eggs

1/2 cup buttermilk

1/2 tsp. vanilla

2 cups all-purpose flour

1 Tbsp. baking powder

1/4 tsp. salt

For the Icing
2 cups powdered sugar

1/2 cup honey

3 Tbsp. lemon juice

Method
1. Preheat the oven to 350°. Line a 12-cup muffin tin with cupcake papers.

2. In a stand mixer, cream the butter and sugar until light and fluffy, on high speed. Mix in honey, eggs, buttermilk and vanilla until blended, on medium speed.

3. Sift together the flour, baking powder and salt, then mix into the batter until just blended. Scoop the batter into the cupcake cups evenly.

4. Bake for about 20 minutes; cupcakes are done when tops spring back lightly to the touch.

To prepare icing
In a small sauce pan, whisk ingredients over medium heat until sugars dissolve together; keep whisking to avoid clumps. Using a spoon, drizzle over the tops of cupcakes, or carefully pour over cupcakes.

Makes one dozen cupcakes.

Original recipe found here
                                    

Friday, October 26, 2012

Cupcake Project #38 : CakeLove's Italian Meringue Frosting


CakeLove, and its owner Warren Brown (a former attorney), have been a D.C. darling for sometime now. Brown pursued his passion of professional cake-baking over a decade ago and has gotten head-nods ranging from American Express to Oprah. His passion has ballooned into a gig on the Food Networkthree books, and six stores located in the finest DMV locales. I recently happed upon his podcasts and I am hooked! He's like the Bob Ross of cake-baking! Check out his calm demeanor as he shows you how to make CakeLove's signature Italian meringue frosting. Enjoy!


Friday, October 19, 2012

Cupcake Project #37: Pumpkin Cupcakes


As Fall continues I'm craving seasonally appropriate foods like squash, pumpkin, nuts, and apples. I adore Laura Vitale and her videos. Imagine my excitement when I saw her recipe for pumpkin cupcakes! These gems are super simple and super sweet- I'm sure. Enjoy Cupcake Lovers!

Friday, October 12, 2012

Cupcake Project #36: Apple-Pie Cupcakes


With the weather changing and leaves falling, it's safe to say that Fall is officially here. Aside from the taste of caramel apples and picking out my Halloween costume, I dig fall for the new flavors that it brings! Apple cinnamon, caramel apple, pumpkin, cranberry, etc. This recipe combines the sweet and comforting smell of apple pie with my beloved cupcakes! Created by inspired.net, this recipe allows for my cooking and baking skills to come together...and I like that. Enjoy Cupcake Lovers! 


Want to find more recipes and cupcake projects? Pick-up a cookbook, or two from Amazon.com


Monday, October 8, 2012

Georgetown Cupcake's 'Sweet Celebrations' Book Tour

Photo courtesy of Amazon.com
The owners of Georgetown Cupcake, and stars of TLC's DC Cupcakes, have released a new book entitled 'Sweet Celebrations'. Authors (and sisters) Katherine Kallinis Berman and Sophie Kallinis LaMontague are going on tour to promote the book which gives cupcake recipes, memories and decorating tips on cupcakes and cupcake creations. The tour will kick off in Brooklyn, NY on Tuesday, October 9th which is also the release date for the book. There will be four stops in the D.C. area at select stores. I'm personally looking forward to the Lavender Earl Grey cupcake recipe which has become my mother's favorite.  


Sweet Celebrations Book Tour Schedule 


October 9Tuesday7pmBookmark Shoppe8415 Third Avenue
Brooklyn, NY
October 10Wednesday7pmBookends211 E. Ridgewood Avenue
Ridgewood, NJ
October 12Friday3pmGeorgetown Cupcake SoHo111 Mercer Street
New York, NY
October 13Saturday3pmBarnes & Noble7851 Tyson’s Corner Center
McLean, VA
October 14Sunday1pmGeorgetown Cupcake
at Bethesda Row
4834 Bethesda Ave
Bethesda, MD
October 15Monday7pmBarnes & Noble555 12th Street NW
Washington, DC
October 17Wednesday7pmWillow Books & Café279 Great Rd
Acton, MA
October 18ThursdayEveningLake Forest Books680 North Western Avenue
Lake Forest, IL
October 22Monday10:30amWashington Hebrew Congregation3935 Macomb Street NW
Washington, DC


Pick up your copy of 'Sweet Celebration' and their previous cookbook, 'The Cupcake Diarieson Amazon.com. 


Friday, October 5, 2012

Cupcake Project #35: White Russian Cupcakes

White Russian Cupcakes Recipe
Photo courtesy of JustAPinch.com

I enjoy fruity cocktails like mojitos and pina coladas but I also enjoy a nice White Russian. Below is a recipe for a White Russian cupcake. What I like about this recipe is its simplicity and virgin option making it perfect for your most modest of guests without sacrificing flavor. Enjoy Cupcake Lovers!

Ingredients
  • 1 Box White Cake Mix
  • 3 eggs
  • 1/3 cup canola oil
  • 3/4 cup coffee liqueur
  • 1/2 cup whole milk
  • 1 stick butter, unsalted
  • 2-4 Tbsp whole milk
  • 1 Tsp pure vanilla extract
  • Powdered sugar or chocolate *

Directions
  1. Preheat the oven to 350 degrees. In the bowl of your electric mixer, combine cake mix, eggs, canola oil, coffee liquer and 1/2 cup of whole milk. Mix according to package directions. 
  2. Line cupcake pans with liners of your choice. For the standard sized cupcakes, measure a scant 1/4 cup of batter per cupcake liner. Bake for 15-20 minutes until done and when pressed in the center with index finger springs back instead of leaving and indentation. 
  3. While cupcakes cool completely, mix frosting. Beat the butter until creamy. Add 3 cups of powdered sugar and beat on low to combine. Add 2 tablespoons of milk, 1 teaspoon of pure vanilla extract and beat well for 2 minutes. If the frosting is too runny and won't strand up to piping  add the other cup of powdered sugar. If frosting is too stiff, add milk, 1 tablespoon at the time, beating well after, until you reach the consistency you desire. The key to having a really good frosting is beating it at medium to high speed for at least 5 minutes. 
  4. Once frosting is ready and cupcakes are cool, prepare your pastry bag with a 1M star tip, fill it with your frosting and apply to the cupcakes. After frosting the cupcakes, use a microplane to grate your favorite chocolate over the top to make them look pretty. If you life, you can also add a chocolate coated espresso bean at the top of each cupcake. 
Original recipe can be found here


Friday, September 28, 2012

Cupcake Project #34: Cupcakes Benedict by The Cupcake Project

Cupcakes Benedict by CupcakeProject.com
(photo courtesy of Cupcake Project)
I have become a major fan of the blog, The Cupcake Project  by a fellow Stef. I was first introduced to the site with their provocative cupcakewurst recipe. I love how Stef pushes the envelope even though she is a blatant perpetrator of cupcake abuse. Nonetheless, I appreciate her creative flair and can excuse the abuse because it appears to be for blogging purposes only and she isn't requiring commercial consumption of her goods or in exchange for money. Further, Stef is the bomb!


(photo courtesy of Cupcake Project)
This recipe for Cupcakes Benedict (a spin on one of my favorite breakfast treats, Eggs Benedict) is supremely creative! The use of bacon and a maple syrup Hollandaise sauce is genius. Go forth and create Cupcakes Lovers!

Start with maple cupcakes:

Maple Cupcake Recipe

Yield: 6 jumbo cupcakes
  • 1 1/2 cups all-purpose flour
  • 1 1/2 teaspoons baking powder
  • 1/2 teaspoon baking soda
  • 1/2 teaspoon salt
  • 1/2 cup sugar
  • 1 cup real maple syrup
  • 1/2 cup unsalted butter, room temperature
  • 2 large eggs, room temperautre
  • 1/2 teaspoon vanilla extract
  • 2/3 cup whole milk
  • 1/4 teaspoon maple extract (optional for a stronger maple flavor)
  1. Preheat oven to 350 F.
  2. In a medium-sized mixing bowl or bowl of a stand mixer, mix together flour, baking powder, baking soda, and salt.
  3. Mix in the sugar and maple syrup until fully combined.
  4. Add the butter and mix on medium-low speed for three minutes.  
  5. Mix in the eggs and vanilla until just combined.
  6. Mix in the milk and maple extract until just combined.
  7. Bake for 20 minutes or until cupcakes bounce back when lightly touched.
Maple Hollandaise Sauce Recipe
I created this maple Hollandaise sauce recipe by slightly modifying Tyler Florence's Hollandaise sauce recipe. Note that Hollandaise sauce should not be made in advance. For best results, it should be served within one hour of preparing it.
  • 4 egg yolks (Because the eggs won't be fully cooked, I highly recommend Safest Choice pasteurized eggs to those concerned about food safety. You can eat Safest Choice eggs completely raw with no worries.)
  • 1 1/2 teaspoons lemon juice
  • 3 tablespoons real maple syrup
  • 1/2 cup unsalted butter, melted
  1. Whisk the egg yolks, lemon juice, and maple syrup together in a stainless steel bowl (or any bowl that you won't melt when you put it on top of a hot saucepan) until the mixture is thickened and doubled in volume. 
  2. Place the bowl over a saucepan containing barely simmering water (or use a double boiler). The water should not touch the bottom of the bowl.
  3. Continue to whisk rapidly. Slowly drizzle in the melted butter and continue to whisk until the sauce is thickened and doubled in volume. Be careful to not let the eggs get too hot or they will scramble.
  4. Remove from heat, cover, and place in a warm spot until ready to use. 
  5. If the sauce gets too thick, whisk in a few drops of warm water before serving.

Next, top the cupcake with the sweetest bacon you can find. 


(photo courtesy of Cupcake Project)

Top the bacon with a poached egg.  

(photo courtesy of Cupcake Project)

Top the poached egg with maple Hollandaise sauce

(photo courtesy of Cupcake Project)

 Find the original recipe here

       Enjoy Free Shipping On All Birthday Gifts. Use offer code: GIFTFS

Friday, September 21, 2012

Cupcake Project #33: Caramel Apple Cupcakes

Caramel Apple Cupcakes
photo courtesy of RachelRay.com
Now that Fall is officially here, I'm in the mood for caramel apples. My favorite treat can only be found during this time of year when changing leaves, going back to school, and dusting off leather boots is apropos. In the spirit of Fall, I wanted a fun recipe that would get everyone in the mood. What's better than caramel apple cupcakes? Further this easy-peasy recipe is by one of my favs, Rachel Ray! Enjoy!

Ingredients

  • 1 1/4 cups flour
  • teaspoons baking powder
  • 1/2 teaspoon ground cinnamon
  • 1/2 teaspoon salt
  • eggs, at room temperature
  • 1/2 cup packed light brown sugar
  • 1/2 cup granulated sugar
  • 1/2 cup vegetable oil
  • teaspoons pure vanilla extract
  • rome apples (about 1 pound), peeled and shredded
  • 1 1/2 cups chewy caramel candies
  • tablespoon heavy crea
    m

Directions

  1. Arrange a rack in the upper third of the oven and preheat to 350 degrees . Line a cupcake pan with baking liners. In a large bowl, whisk together the flour, baking powder, cinnamon and salt.
  2. In a medium bowl, whisk together the eggs, brown sugar and granulated sugar until smooth. Whisk in the oil and vanilla. Stir into the flour mixture until just combined; stir in the apples. Spoon the batter into the prepared pan until almost full. Bake until golden and a toothpick inserted in the center comes out dry, 25 to 30 minutes. Transfer to a rack to cool completely.
  3. In a small, microwavable bowl, combine the caramels and cream. Microwave for 1 minute at medium power, then stir; repeat in 30-second intervals until melted and smooth. Let cool. Spread the frosting generously on the cooled cupcakes.
Find the original recipe here.

                                                            FavorAffair.com (The Shops at 24Seven)

Friday, September 14, 2012

Cupcake Project #32: Pinata Cupcakes

Photo courtesy of  La Receta de la Felicidad
 I have been fascinated with pinata cupcakes since early this summer when I saw a few of them floating through the Pinter-verse. How exactly does one bake candies into a cupcake without them melting? Well, with a bit of baker magic, you can create a protective bubble encasing for them, and provide an anticipated treat for the cupcake recipient. Enjoy!

DIY Pinata Cupcakes
Photo courtesy of  La Receta de la Felicidad 
 
Ingredients:
  • 150 Grams of dark chocolate
  • 6  cavities hemisphere  silicone molds. 
  • 6 cupcakes (any flavor)
  • Candy for the pinata (MM's , Smarties, Nerds, etc.)
  • toppings or decorations (optional)
Directions:

1. Melt chocolate in microwave or using a double boiler. 
2. Place two teaspoons melted chocolate on each mold cavity, and swirl chocolate to coat every half hemisphere cavity. Keep rotating the mold until the chocolate sets (depending on room temperature. This may take a while)
3. Let the chocolate set. 
4. Unmold the chocolate dome carefully, fill with candies and place carefully over every cupcake. Do it quickly as to not leave fingerprints.

Original recipe found here
 

Friday, August 24, 2012

Cupcake Project #31: Frog Cupcakes


Growing up, I was a huge fan of Jim Henson's Muppets. My favorite Muppets were Miss Piggy and her beau, Kermit. Their relationship dynamic was an interesting one that bordered between co-dependency and mutually beneficial. I appreciated Kermit's easy-going nature, general outlook on life and understated one-liners. This tutorial will have you feeling easy about being green. The tutorial is quick, easy and a fun project for kids as well as adults. Enjoy!

Thursday, August 23, 2012

Sprinkles' Key Lime Cupcake Recipe


                            video platform video management video solutions video player

On my first visit to Sprinkles in May 2011, I experienced their key-lime cupcakes. I say "experience" because, to quote myself, "It made me do the Dougie". Whenever a cupcake (or any food item) makes you want to dance spontaneously- that's an amazing cupcake. This morning on GMA, Cupcake Wars judge and Sprinkles owner, Candace Nelson, coughs up the recipe for Sprinkles' key-lime cupcakes and reveals a telling secret on how to make it pop. That started my morning off right! Thanks GMA!

                   Olivia Mae Beauty LLC

Friday, August 17, 2012

Cupcake Project #30: Cupcake Poppers


Cupcake Poppers! I get excited just typing it! They look like the ever popular French macarons but they taste like my beloved cuppies. They're really more like cupcake sandwiches which will make them a fast finger food favorite at any gala. I love the bright colors that they come in and the ease of use. Not one to waste good cuppies, this Betty Crocker recipe also provides cake pop tips for the leftovers. Tell me Cupcake Lovers, what flavors will you make?

Friday, August 10, 2012

Cupcake Project #29: Mini Strawberry Cupcakes


    Cupcake Strawberries
    Photo courtesy of Duncan Hines 

Strawberry cupcakes are my absolute favorite! And as the self-proclaimed Queen of the fake and bake (boxed cake mix with homemade frosting), this summertime recipe is just what I needed. The recipe is a Duncan Hines original; they also happen to me my preferred cake mix of choice. The recipe pays close attention to details by requiring woodstick for stems and sesame seeds for strawberry seeds- too cute. Expect to yield 48 of these strawberry minis. Enjoy!
Ingredients:
  • 1 box (18.25) Duncan Hines Moist Deluxe Strawberry Supreme Cake Mix
  • 1 can plus 1 cup  Duncan Hines Creamy Home-Style Classic Vanilla Frosting
  • Red paste food coloring
  • 48 thin chocolate cookie crisps (100 calorie Oreo Crisps)
  • 12 spearmint leaves
  • 12 wheat stickes or thin pretzels (Pringles)
  • 2 tablespoons sesame seeds.
Directions:
Preheat the oven to 350°F. Line 48 mini muffin cups with red mini foil liners. Prepare the cake mix according to package directions.

Divide the batter evenly between the prepared pans. Bake until cupcakes are lightly golden and a toothpick inserted in center comes out clean, 8 to 12 minutes. Transfer the cupcakes to a wire rack and cool completely.
Tint the vanilla frosting red with the red paste food coloring.

Spread a small dot of red frosting on top of the cupcakes and press a thin chocolate cookie, allowing cookie to overhang cupcake slightly at a point. 
Spread some of the remaining red frosting on top of the cookie and cupcake to mound slightly and make smooth. Sprinkle the top with the sesame seeds. Repeat with the remaining cupcakes and frosting.

Roll out the spearmint leaves in the sugar making sure to keep them covered with sugar to prevent sticking. Cut out green tops of strawberries using the template and some scissors. Cut the wheat sticks into 1 1/2 inch long pieces. Poke a hole in the center of the green top and insert the wheat stick. Press the other end of the wheat stick into the wide end of the top of the cupcake to finish the strawberry. Repeat with the remaining cupcakes.

The original recipe can be found here.
                                        

Friday, August 3, 2012

Cupcake Project #28: Rainbow Cupcakes

Who doesn't love a rainbow? Or a burst of color in their cakes? Rainbow cupcakes have fascinated me for a while. How do they get all the bright and beautiful goodness into one cake? Well this video dispelled all the mystery for me. It's super simple, fun and easy to follow. I also dig the British accent. Enjoy Cupcake Lovers!
     

Wednesday, August 1, 2012

Meet CakeLove's Warren Brown

Photo courtesy of Cake Love
Meet Warren Brown, owner of CakeLove and author of  Cakelove: How to Bake Cakes from Scratch, this Thursday, August 2, 2012 at their Shirlington location from 5PM-8PM. He will be signing copies of his new book, Cake Love in the Morning, which will be available for purchase while supplies last.                          
                      
                        Shop Taste of Home

Friday, July 27, 2012

Cupcake Project #27: Cupcake Stilettos


This week's cupcake project is one that is very close to my heart. It involves shoes and cupcakes! I saw my first cupcake stiletto over a year ago and have been fascinated with them ever since. To me, it is one of the most creative ventures in cupcake-tivity as it melds cupcakes, cookies, candy and fondant. Check out this video that is giving you step-by-step instructions on how to stay cupcake chic...Enjoy! 


                         Too Faced Cosmetics

Friday, July 20, 2012

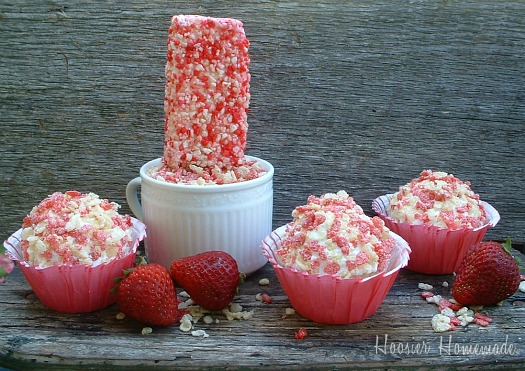
Cupcake Project #26: Strawberry Shortcake Ice Cream Bar Cupcakes

Strawberry Shortcake Ice cream Bar Cupcakes
(Photo courtesy of Hoosier Homemade)
One of my favorite summertime indulgences are the strawberry shortcake ice cream bars. As a child I answered the sweet siren of the ice cream truck would buy the ice cream bar simply because it was pink; and pink was and is my favorite color. Now that I'm an adult, I still enjoy the treat from time to time. Seeing it in cupcake form is amazing and this recipe is a sure fire hit! Enjoy!

Ingredients

White Cupcakes
1 small box instant vanilla pudding
2 cups cold milk (for pudding)
Strawberry syrup (like Nesquick)
No-taste Red Coloring
Buttercream or Decorator Icing
2 Cups Puffed Rice 
1 small box of strawberry gelatin


(Photo courtesy of Hoosier Home
Instructions
1. Bake and cool cupcakes. 
2. While the cupcakes are cooling, mix the pudding and milk and put in the fridge for at least 5 minutes. 
3. Stir in a little red coloring until you get the desired color. 
4. Place back in fridge. 
5. Bring 1 cup of water to a boil in microwave and add the strawberry  gelatin .
6. Pour the gelatin over 1 cup of puffed rice, mix very well. Spread out evenly onto piece of wax paper, and let dry while you prepare the cupcakes. 
7. After the cupcakes are cooled, use an apple corer to remove a plug for the pudding. 
8. Fill with pudding and add the top half of the plug back into the cupcake. Place in the fridge. 
9. Chop puffed rice in food processor. You can chop 2 colors separately. The red puffed rice takes a little more time to chop. 
10. After both are chopped, stir together well. 
11. Frost cupcakes, and dip cupcake in puffed rice mixture. Sprinkle more on top if necessary.

Dylans Candy Bar

Friday, July 13, 2012

Cupcake Project #25: How to Fill Cupcakes


I found this quick guide to filling and frosting cupcakes on my Google+ feed.  While there, I came across this fabulous site called Shop Baker's Nook and found this informative video. I appreciate the ease of use in the filling and never thought about using a piping bag or nozzle for my fillings. Anywhoo, with the permission of Baker's Nook, I give you how to fill and frost a cupcake! Enjoy Cupcake Lovers! 

Limited Edition GLEE candy at Dylan's Candy Bar!

Friday, June 29, 2012

Cupcake Project #24: Cupcake Kabobs

Kabob-6
Photo courtesy of The Mom Blog
I loooove a good BBQ! It's the only social event where you can eat food with your hands and be as sloppy as you dare without the side-eye fear of social ridicule. With the Fourth well underway, I thought that this fun and festive recipe would be perfect for celebrating the country's independence. Besides, what's more American than cupcakes? This cupcake kabob recipe is so easy, even a Critic can do it. Check it out!

Ingredients

• White cake cupcakes 
• Red Velvet cupcakes
• Blue food coloring 
• Large marshmallows
• ¼ cup of water
• White frosting (your recipe or container of Funfetti 4th of July frosting)
• Bamboo skewers
• Assorted sprinkles and colored sugars in patriotic colors
• Fruit –- strawberries, blueberries, raspberries, bananas whichever you prefer

Kabob-3
Photo courtesy of The Mom Blog
Prepare
Put the white frosting in a bowl and microwave until soft and smooth, about 15 seconds. Pour the sprinkles in separate bowls. For these kabobs, I used 3 bowls –1 for red sugar, 1 for blue sugar, and 1 for a mix of red, white and blue sprinkles and nonpareils. Get ¼ cup of water. You can leave this in the measuring cup. Put the large marshmallows in a bowl. Cut up your fruit into bite size pieces. Put your cooled cupcakes on a plate.
Take a mini cupcake and dip the top into the warmed frosting. Then dip into the sprinkles. Do this with all the mini cupcakes. You may need to reheat the frosting if the cupcakes start to get stuck in the bowl. Just reheat in 10-second increments until it’s smooth again. Keep dipping until all the cupcakes are done.
Grab a large marshmallow and dip one end into the water. Let any excess water drip off then dip one end into the red colored sugar. Turn it over and dip the other end into the water. Let excess water drop off then dip into the blue colored sugar. Set aside to dry.

Kabob-4
Photo courtesy of The Mom Blog

Assemble 

Take one bamboo skewer in your hand and slide a red cupcake down leaving at least 1” of skewer in your hand. Next, slide a marshmallow down, then a piece of fruit (for this skewer I used strawberries). Take a white cupcake and slide that down on top of the piece of fruit, followed with a marshmallow and another piece of fruit. Top the skewer off with the blue cupcake. Continue this until you’ve made as many skewers as you’d like.

Kabob-7
Photo courtesy of The Mom Blog
Original recipe can be found here
Related Posts Plugin for WordPress, Blogger...